
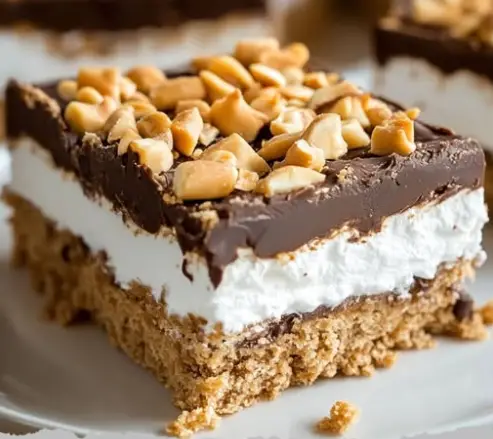
If you’re a fan of peanut butter and chocolate, you’re in for a treat! Peanut Butter Dream Bars are the ultimate no-bake dessert that combines creamy peanut butter, fluffy marshmallow, and rich chocolate into one irresistible treat. Perfect for parties, potlucks, or just satisfying your sweet tooth, these bars are easy to make and even easier to enjoy.
No-bake desserts have become a staple for busy bakers and dessert lovers alike. They’re quick, simple, and require minimal effort. If you’re looking for more no-bake dessert ideas, check out this guide. Now, let’s dive into the recipe and make some Peanut Butter Dream Bars!
Ingredients for Peanut Butter Dream Bars
To make these decadent no-bake bars, you’ll need the following ingredients:
For the Base:
- 1 1/2 cups crushed graham crackers: Provides a crunchy, sweet foundation.
- 1 cup creamy peanut butter: The star ingredient for richness.
- 1/2 cup unsalted butter, melted: Binds the base together.
- 1 cup powdered sugar: Adds sweetness without graininess.
For the Layers:
- 1 jar (7 oz) marshmallow fluff: Creates a fluffy, sweet layer.
- 1 1/2 cups semi-sweet chocolate chips: Perfect for a smooth chocolate layer.
- 1/2 cup heavy cream: Helps create a silky chocolate ganache.
- 1/2 cup chopped peanuts: Adds crunch and nutty flavor.
Pro Tip: For a gluten-free version, use gluten-free graham crackers or substitute with crushed gluten-free cookies.
Step-by-Step Directions
1. Prepare the Dish
- Line a 9×9-inch baking dish with parchment paper, leaving some overhang for easy removal.
Why parchment paper? It ensures the bars lift out cleanly without sticking.
2. Make the Base
- In a bowl, mix the crushed graham crackers, peanut butter, melted butter, and powdered sugar until well combined.
- Press the mixture evenly into the bottom of the prepared baking dish.
Tip: Use the back of a spoon or a flat measuring cup to press the base firmly.
3. Add the Marshmallow Layer
- Spread the marshmallow fluff evenly over the peanut butter layer.
Pro Tip: Lightly grease your spatula to prevent the fluff from sticking.
4. Melt the Chocolate
- In a microwave-safe bowl, heat the chocolate chips and heavy cream in 20-second intervals, stirring in between, until smooth and fully melted.
Why intervals? It prevents the chocolate from burning and ensures a smooth consistency.
5. Layer the Chocolate
- Pour the melted chocolate over the marshmallow layer and spread it evenly with a spatula.
Tip: Work quickly to prevent the chocolate from setting before spreading.
6. Top & Chill
- Sprinkle the chopped peanuts over the chocolate layer.
- Refrigerate for at least 2 hours or until fully set.
Pro Tip: Chill overnight for the cleanest slices.
7. Slice & Serve
- Once chilled, lift the bars out of the dish using the parchment paper and slice into squares.
Serving Suggestion: Serve with a glass of milk or a scoop of vanilla ice cream.
Nutritional Information
- Prep Time: 15 minutes
- Chill Time: 2 hours
- Total Time: 2 hours 15 minutes
- Calories: 380 kcal per serving
- Servings: 12 bars
Tips and Tricks for Perfect Peanut Butter Dream Bars
- Add Extra Crunch: Mix crushed pretzels into the peanut butter layer for a salty-sweet twist.
- Chill Overnight: This ensures clean, neat slices.
- Store Properly: Keep the bars in an airtight container in the fridge for up to 5 days.
- Get Creative: Experiment with different toppings like shredded coconut or drizzled caramel.
FFAQs: Peanut Butter Dream Bars
Q1: Can I make Peanut Butter Dream Bars ahead of time?
Yes! Store them in an airtight container in the fridge for up to 5 days.
Q2: Can I use crunchy peanut butter instead of creamy?
Absolutely, but creamy peanut butter creates a smoother texture.
Q3: Are there gluten-free or vegan options?
Yes, use gluten-free graham crackers and vegan marshmallow fluff.
Q4: How do I prevent the chocolate layer from cracking?
Ensure the chocolate is fully melted and spread evenly before chilling.
Q5: Can I use other nuts instead of peanuts?
Definitely! Try almonds, cashews, or pecans for a different flavor.
Creative Variations
- Caramel Swirl Bars: Add a layer of caramel sauce between the marshmallow and chocolate.
- White Chocolate Bars: Use white chocolate instead of semi-sweet for a sweeter twist.
- Cookie Dough Bars: Mix edible cookie dough into the base layer.
- Seasonal Variations: Use festive toppings like sprinkles or crushed candy canes for holidays.
Why Peanut Butter Dream Bars are Perfect for Gatherings
These bars are a crowd-pleaser! They’re easy to make in large batches, require no baking, and combine flavors everyone loves. Plus, they’re a great way to get kids involved in the kitchen. For more tips on melting chocolate perfectly, check out this guide.
Conclusion
Peanut Butter Dream Bars are the ultimate no-bake dessert that’s sure to impress. With their rich layers of peanut butter, marshmallow, and chocolate, they’re a treat you’ll want to make again and again. So grab your ingredients, follow the steps, and enjoy these decadent bars with your loved ones!
Don’t forget to share your creations on social media and tag us. Happy baking! 🍫🥜
Print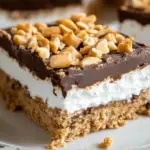
Peanut Butter Dream Bars
- Total Time: 2 hours 15 minutes
Description
Indulge in the ultimate no-bake dessert with these Peanut Butter Dream Bars! Featuring a rich, crunchy graham cracker and peanut butter base, a fluffy marshmallow layer, and a silky chocolate topping, these bars are a dream come true for anyone who loves the classic combination of peanut butter and chocolate. Perfect for parties, potlucks, or a sweet treat at home, these bars are easy to make, require no baking, and are sure to impress. Whether you’re a seasoned baker or a beginner, this recipe is foolproof and guaranteed to satisfy your sweet tooth.
Ingredients
For the Base:
- 1 1/2 cups crushed graham crackers: Provides a crunchy, sweet foundation.
- 1 cup creamy peanut butter: The star ingredient for richness.
- 1/2 cup unsalted butter, melted: Binds the base together.
- 1 cup powdered sugar: Adds sweetness without graininess.
For the Layers:
- 1 jar (7 oz) marshmallow fluff: Creates a fluffy, sweet layer.
- 1 1/2 cups semi-sweet chocolate chips: Perfect for a smooth chocolate layer.
- 1/2 cup heavy cream: Helps create a silky chocolate ganache.
- 1/2 cup chopped peanuts: Adds crunch and nutty flavor.
Instructions
1. Prepare the Dish
- Line a 9×9-inch baking dish with parchment paper, leaving some overhang for easy removal.
Why parchment paper? It ensures the bars lift out cleanly without sticking.
2. Make the Base
- In a bowl, mix the crushed graham crackers, peanut butter, melted butter, and powdered sugar until well combined.
- Press the mixture evenly into the bottom of the prepared baking dish.
Tip: Use the back of a spoon or a flat measuring cup to press the base firmly.
3. Add the Marshmallow Layer
- Spread the marshmallow fluff evenly over the peanut butter layer.
Pro Tip: Lightly grease your spatula to prevent the fluff from sticking.
4. Melt the Chocolate
- In a microwave-safe bowl, heat the chocolate chips and heavy cream in 20-second intervals, stirring in between, until smooth and fully melted.
Why intervals? It prevents the chocolate from burning and ensures a smooth consistency.
5. Layer the Chocolate
- Pour the melted chocolate over the marshmallow layer and spread it evenly with a spatula.
Tip: Work quickly to prevent the chocolate from setting before spreading.
6. Top & Chill
- Sprinkle the chopped peanuts over the chocolate layer.
- Refrigerate for at least 2 hours or until fully set.
Pro Tip: Chill overnight for the cleanest slices.
7. Slice & Serve
- Once chilled, lift the bars out of the dish using the parchment paper and slice into squares.
Notes
Notes for Peanut Butter Dream Bars
- Ingredient Substitutions:
- For a gluten-free version, use gluten-free graham crackers or crushed gluten-free cookies.
- For a vegan version, use vegan marshmallow fluff, dairy-free chocolate chips, and coconut cream instead of heavy cream.
- Substitute almond butter or cashew butter for peanut butter if preferred.
- Storage Tips:
- Store the bars in an airtight container in the refrigerator for up to 5 days.
- For longer storage, freeze the bars for up to 2 months. Thaw in the fridge before serving.
- Serving Suggestions:
- Serve chilled for the best texture.
- Pair with a glass of milk, coffee, or a scoop of vanilla ice cream for an extra treat.
- Customization Ideas:
- Add crushed pretzels to the base for a salty-sweet twist.
- Top with shredded coconut, sprinkles, or drizzled caramel for added flair.
- Use white chocolate or dark chocolate instead of semi-sweet chocolate for a different flavor profile.
- Chilling Time:
- For clean, neat slices, chill the bars for at least 2 hours, or preferably overnight.
- Allergy Considerations:
- Be mindful of nut allergies if serving to others. You can omit the chopped peanuts or use a seed-based alternative like sunflower seeds.
- Prep Time: 15 minutes
- Cook Time: 2 hours
Nutrition
- Serving Size: 12 bars
- Calories: 380 kcal per serving
- Sugar: 28g
- Sodium: 150mg
- Fat: 24g
- Saturated Fat: 10g
- Unsaturated Fat: 12g
- Trans Fat: 0g
- Carbohydrates: 35g
- Fiber: 2g
- Protein: 6g
- Cholesterol: 25mg
Keywords: No-bake peanut butter bars Peanut butter chocolate bars Marshmallow peanut butter dessert Layered peanut butter treats Easy no-bake dessert bars