
Do you ever have those days when you’re desperately craving something rich and chocolatey, but the rational part of your brain is reminding you about those fitness goals you set? That internal tug-of-war was my constant companion until I stumbled upon this recipe. “Can’t I just have something that tastes sinfully good but isn’t actually sinful?” I’d wonder, standing in front of my pantry late at night. These brownie muffins were born from that very question—a moment of culinary inspiration that changed my relationship with dessert forever.
These aren’t just muffins; they’re little miracles of baking science. They have the dense, fudgy texture of a proper brownie but come in a perfectly portioned muffin form. The dark chocolate intensity satisfies even the most serious chocolate cravings, while the Greek yogurt and peanut butter add protein that keeps you satisfied. I’ve brought these to potlucks where they disappeared in minutes, with friends demanding the recipe and refusing to believe me when I whispered they were actually healthy.
The Story Behind the Recipe
I discovered this recipe during what I now affectionately call “The Great Brownie Disaster of 2022.” I had promised to bring dessert to a book club meeting—something impressive that would pair well with our host’s famous coffee. Naturally, I waited until the last minute (a recurring theme in my kitchen adventures) and decided brownies would be quick and foolproof.
Well, they should have been. Somehow, I managed to grab baking soda instead of baking powder, and my brownies ended up with a strange, soap-like aftertaste that no amount of ice cream could mask. With only an hour before I needed to leave and a kitchen that looked like a chocolate bomb had exploded, I frantically searched my refrigerator for salvation.
What I found was a container of Greek yogurt, a nearly empty jar of peanut butter, and half a bar of dark chocolate I’d been saving for a special occasion. Having recently experimented with healthier baking using oat flour, I wondered if I could combine these ingredients into something presentable. I wasn’t aiming for greatness—merely edible would do.
What came out of the oven 20 minutes later wasn’t just edible; it was transformative. The centers were still warm and gooey when I arrived at book club, and the conversation about our novel was temporarily abandoned as everyone demanded to know what was in “those amazing brownie things.” When I confessed they were made with yogurt and oat flour, one friend actually accused me of lying. That’s how good these are—they defy what we think “healthy” should taste like.
Ingredients Breakdown
These muffins may seem magical, but their power comes from a thoughtful balance of ingredients. Let’s break them down:
- 1/2 cup Greek yogurt – This is the secret to the moist, fudgy texture. I use full-fat because I find the flavor and texture superior, but 2% works well too if you’re watching your fat intake. The tanginess of the yogurt also enhances the chocolate flavor in a way that’s hard to describe but absolutely delicious. One time I only had vanilla Greek yogurt on hand—the result was slightly sweeter but equally delicious.
- 1/3 cup peanut butter – Look for natural peanut butter with oil on top—the kind you need to stir. Yes, it’s annoying when it sloshes over the sides of the jar (I’ve ruined more than one shirt this way), but the pure peanut flavor is worth it. The oils in natural peanut butter also contribute to the moist texture. I keep my jar upside down in the refrigerator for a day before opening it—this helps the oils distribute evenly and makes stirring much easier.
- 1/4 cup honey or maple syrup – I’ve tried both and slightly prefer maple syrup for its more complex flavor, but honey creates a beautiful chewiness that’s more brownie-like. Sometimes I use a darker grade of maple syrup (formerly called Grade B) for an almost caramel-like undertone. Either way, we’re using far less sweetener than traditional brownies, which can contain up to a cup of refined sugar.
- 1 egg – This provides structure and helps everything bind together. Make sure it’s at room temperature for the best incorporation. If I forget to take it out early (which happens more often than I’d like to admit), I place it in a bowl of warm water for a few minutes to take the chill off.
- 1 teaspoon vanilla extract – Don’t skimp here! Real vanilla extract makes a noticeable difference in the depth of flavor. I keep a small bottle of the good stuff specifically for chocolate recipes where the vanilla will really shine. If you want to get fancy, try scraping in the seeds from half a vanilla bean instead.
- 1/4 cup cocoa powder – This is where the intense chocolate flavor comes from. I use Dutch-processed cocoa powder for a smoother, less acidic flavor, but natural cocoa powder works too. Just sift it first if you see any lumps—no one wants to bite into a dry pocket of cocoa powder. For an even more intense chocolate experience, I sometimes use dark cocoa powder, which creates a nearly black muffin that looks positively decadent.
- 1/2 cup oat flour – I make my own by pulsing rolled oats in my food processor until they’re fine and powdery. It’s much cheaper than buying pre-made oat flour, and it takes less than a minute. The subtle sweetness of oats complements the chocolate and peanut butter beautifully, and the fiber helps keep you full. I always keep a jar of homemade oat flour in my pantry for impromptu baking sessions.
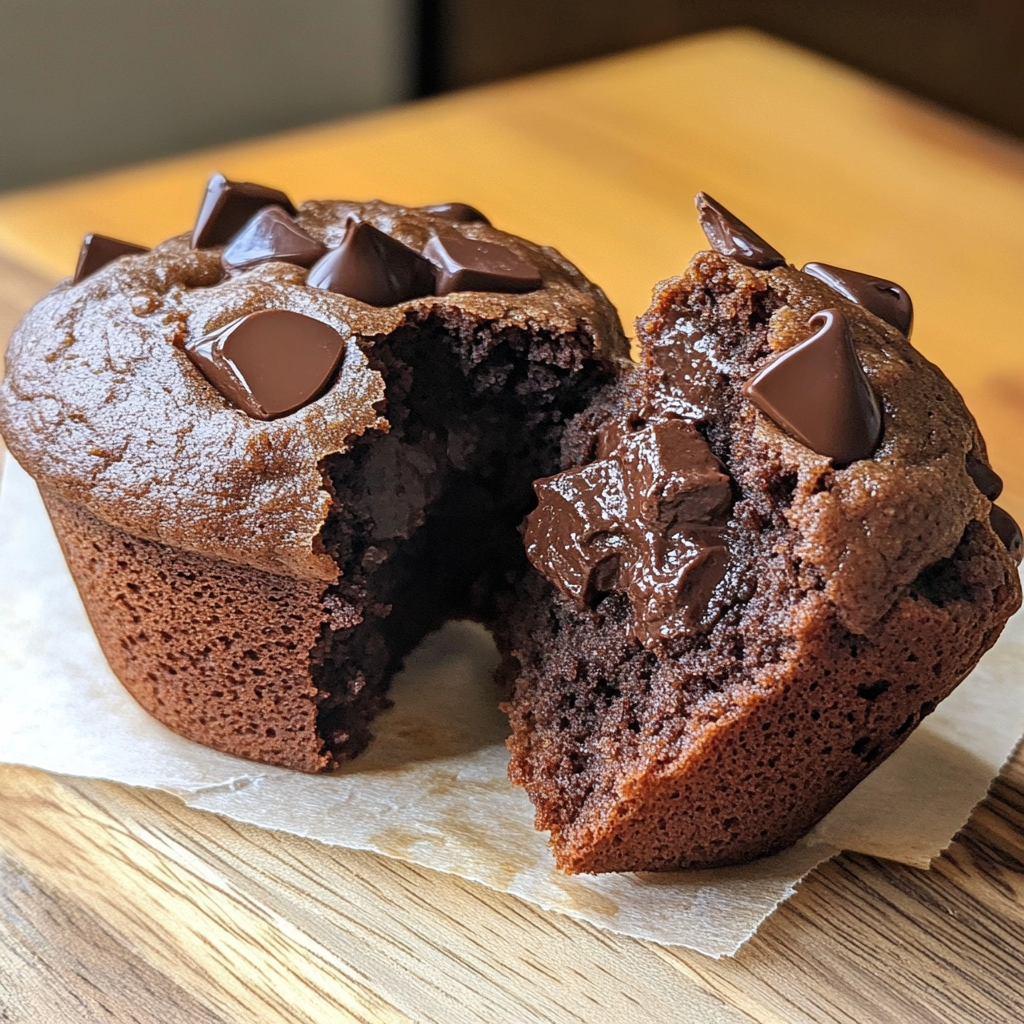
- 1/4 cup dark chocolate chunks – The higher the cocoa percentage, the better in my opinion. I like around 70% for the perfect balance of bitterness and sweetness. Rather than using store-bought chunks, I often chop a good chocolate bar into irregular pieces—this creates pockets of melted chocolate of different sizes throughout the muffins. Some bites have tiny flecks of chocolate, while others reveal glorious molten chocolate pockets.
- 1/2 teaspoon baking powder – This provides just enough lift without making them cakey. We’re going for dense and fudgy here, not light and airy. Once I accidentally left this out entirely, and while the muffins were extremely dense, several friends told me they preferred that ultra-fudgy version!
- Pinch of salt – This is non-negotiable! Salt enhances the chocolate flavor and balances the sweetness. I prefer fine sea salt, but kosher salt works well too. If you want to get fancy, sprinkle a few flakes of Maldon sea salt on top before baking for a sophisticated sweet-salty contrast.
Step-by-Step Instructions with Tips
- Preheat your oven to 350°F (175°C) – I always do this first to give my ancient oven plenty of time to reach the right temperature. While waiting, line a standard muffin tin with paper liners. If you have silicone liners, even better—these muffins can sometimes stick to paper. A light spritz of cooking spray in each liner provides extra insurance against sticking.
- Prepare your wet ingredients – In a medium bowl, combine the Greek yogurt and peanut butter. Here’s a little hack I discovered through much trial and error: heat your peanut butter for about 15 seconds in the microwave before measuring. This makes it pour easily off the measuring spoon and mix more smoothly with the yogurt. Add the honey or maple syrup, egg, and vanilla extract, then mix until smooth. I use a fork for this step—it breaks up the peanut butter more effectively than a spoon.
- Mix in the dry ingredients – Sprinkle the cocoa powder, oat flour, baking powder, and salt over the wet mixture. Stir gently until just combined. The key word here is “gently”—overmixing will develop the gluten in the flour and make your muffins tough. I stir with a rubber spatula in a figure-eight motion until I no longer see streaks of flour. The batter will be quite thick and almost mousse-like.
- Add the chocolate chunks – Fold in the dark chocolate chunks with just a few strokes. I like to reserve a small handful to place on top of the muffins before baking—this gives them a professional bakery look and ensures you get some melty chocolate in every bite. Sometimes I also add a tablespoon of cacao nibs for a little crunch and extra antioxidants.
- Fill your muffin cups – Divide the batter evenly among 6-7 muffin cups. Don’t try to stretch it to make 12—these are meant to be generous, satisfying portions. I use an ice cream scoop with a release mechanism, which makes this job incredibly easy and ensures uniform sizing. Fill each cup about 3/4 full, then add your reserved chocolate chunks on top, gently pressing them into the batter slightly.
- Bake with intention – Place the tin in the preheated oven and set your timer for 18 minutes. Resist the urge to open the oven door during baking—the rush of cool air can cause your muffins to sink in the middle. These muffins are done when the tops are set and no longer shiny, but still soft when gently pressed. A toothpick inserted should come out with moist crumbs, not completely clean (that would mean they’re overbaked). Remember, we want fudgy centers! In my oven, they’re perfect at 20 minutes, but start checking at 18.
- The cooling phase – Allow the muffins to cool in the tin for 10 minutes before transferring to a wire rack. This resting period is crucial—it allows the muffins to set up properly and the melted chocolate chunks to return to a soft-solid state. If you try to remove them too soon, they may fall apart because of those gloriously fudgy centers. I know it’s tempting to dive right in (the smell will drive you crazy!), but patience pays off here.
Serving Ideas
These brownie muffins are incredibly versatile. My absolute favorite way to enjoy them is slightly warm, about 10 minutes out of the oven, when the chocolate chunks are still melty but the muffin holds together perfectly. If you’re reheating from storage, 10-15 seconds in the microwave achieves this perfect state.
For breakfast, I’ve been known to split one in half, toast it lightly, and spread with a thin layer of additional peanut butter or a dollop of Greek yogurt mixed with a drizzle of honey. The contrast of warm muffin and cool, tangy yogurt is absolutely divine with morning coffee.
When I’m feeling particularly indulgent, I’ll use these as the base for a healthier brownie sundae. Top a warm muffin with a small scoop of good vanilla ice cream or frozen yogurt, a drizzle of melted peanut butter, and a sprinkle of cacao nibs. My dinner guests never believe this dessert is actually nutritious.
They also make fantastic gifts. I’ll wrap a few in parchment paper, tie with kitchen twine, and bring them to friends who are having a rough day. There’s something about homemade baked goods that says “I care about you” more effectively than words, especially when they’re still slightly warm from the oven.
For kids’ lunchboxes, I make a mini version using a 24-cup mini muffin tin and reduce the baking time to about 12 minutes. My nephew thinks he’s getting away with something when he finds these in his lunch, completely unaware they’re packed with protein and whole grains.
Health Benefits
What makes these brownie muffins truly special is their nutritional profile. Let me break it down:
The Greek yogurt isn’t just there for moisture—it packs a serious protein punch. A half cup contains roughly 12 grams of protein, helping to distribute that across our muffins. The probiotics in yogurt are also beneficial for gut health, though some are diminished in the baking process.
Peanut butter contributes healthy monounsaturated fats and more protein—about 8 grams per serving. These healthy fats help keep you satisfied longer and actually assist your body in absorbing fat-soluble vitamins. I notice these muffins keep me full for hours, unlike traditional brownies that leave me hungry again quickly.
Oat flour is a nutritional powerhouse compared to refined white flour. It contains more fiber, protein, and micronutrients, and has a lower glycemic index, meaning it causes a more gradual rise in blood sugar rather than a spike and crash. The soluble fiber in oats, called beta-glucan, is particularly beneficial for heart health.
Dark chocolate (both the cocoa powder and chunks) contains flavanols that act as antioxidants, potentially improving blood flow and lowering blood pressure. The higher the cocoa percentage, the greater these benefits. Some research even suggests the polyphenols in cocoa may improve cognitive function and mood—which might explain why these muffins always make me happy!
Using honey or maple syrup instead of refined sugar provides additional minerals and antioxidants. While they’re still forms of sugar and should be consumed in moderation, they offer more nutritional value than the empty calories of white sugar.
All told, each muffin contains approximately 200-220 calories with about 8 grams of protein and 4 grams of fiber—a nutritional profile that allows you to enjoy chocolate for breakfast without an ounce of guilt.
Storage and Freezing Tips
These brownie muffins will keep at room temperature in an airtight container for about 2 days, but because they contain yogurt, I prefer to refrigerate them if keeping them longer than that. In the refrigerator, they’ll stay fresh for up to a week.
The texture does change slightly in the refrigerator—they become fudgier and more truffle-like. Some of my friends actually prefer them this way! To restore the original texture, simply microwave for 10-15 seconds or place in a 300°F oven for about 5 minutes.
These muffins freeze beautifully, which is why I often make a double batch. Let them cool completely, then wrap each muffin individually in plastic wrap before placing in a freezer bag or container. This prevents freezer burn and allows you to thaw just one at a time. They’ll keep for up to 3 months in the freezer.
To thaw, you have a few options: transfer to the refrigerator overnight, let sit at room temperature for about an hour, or microwave directly from frozen for 30-45 seconds. I personally prefer the microwave method because it recreates that freshly-baked warmth and slightly melts the chocolate chunks again.
One important note: the paper liners tend to pull away from the muffins during freezing. This isn’t a problem, but something to be aware of if presentation is important. If freezing for a special occasion, consider using silicone liners or freezing them unlined, then placing in fresh paper liners after thawing.
Customization Ideas
This recipe is wonderfully adaptable. Here are some variations I’ve tried and loved:
For an espresso brownie version, add 1 teaspoon of instant espresso powder to the dry ingredients. The coffee flavor enhances the chocolate without being obviously coffee-flavored. I often make these for morning meetings—they’re the perfect excuse to have chocolate for breakfast!
If you’re a fan of spice with your chocolate, add 1/4 teaspoon of cinnamon and a pinch of cayenne pepper. This creates a Mexican chocolate profile that’s subtle but intriguing. I serve these with cinnamon whipped cream during the holiday season.
For a nuttier version, replace 2 tablespoons of the oat flour with almond flour and add 2 tablespoons of chopped almonds along with the chocolate chunks. The textural contrast is wonderful, and you get the benefit of additional healthy fats from the almonds.
If peanut allergies are a concern, almond butter or sunflower seed butter make excellent substitutions. Sunflower seed butter creates a slightly different flavor profile that pairs beautifully with a 1/4 teaspoon of orange zest added to the batter.
For special occasions, press a small square of caramel into the center of each muffin before baking for a molten caramel surprise. Not quite as healthy, but absolutely delicious for a treat.
And during summer months, I love adding 1/4 cup of fresh raspberries to the batter. The tartness of the berries contrasts beautifully with the rich chocolate, and the pink juice creates gorgeous streaks throughout the muffins.
FAQ
Can I make these without the peanut butter? Yes! You can substitute any nut or seed butter. Almond butter creates a milder flavor, while cashew butter makes them extra creamy. For a nut-free version, sunflower seed butter works beautifully. Just be aware that sunflower seed butter can sometimes react with baking powder to create a harmless green color inside the muffins!
My muffins sank in the middle after baking. What went wrong? This usually happens when they’re slightly undercooked or when the oven door is opened too early in the baking process. These muffins are meant to be fudgy, but the centers should still be set. Next time, try adding 1-2 minutes to your baking time. Also, make sure your baking powder is fresh—it typically loses potency after about 6 months.
Can I use regular flour instead of oat flour? Absolutely. All-purpose flour works as a 1:1 replacement for oat flour in this recipe. Whole wheat pastry flour is another good option that maintains some nutritional benefits. The texture will be slightly different—generally a bit less tender—but still delicious.
Can I make these vegan? Yes! Replace the egg with a flax egg (1 tablespoon ground flaxseed mixed with 3 tablespoons water, left to sit for 5 minutes). Use plant-based yogurt like coconut or almond milk yogurt, and make sure your dark chocolate doesn’t contain milk solids. Choose maple syrup rather than honey as your sweetener.
How can I make these even more chocolatey? For extreme chocolate lovers (I count myself among you), increase the cocoa powder to 1/3 cup and use chocolate chips throughout the batter instead of chunks. You can also drizzle melted dark chocolate over the top of the baked and cooled muffins for a truffle-like experience.
Why are my muffins dry? The most common culprit is overbaking. These muffins continue to firm up as they cool, so they should seem slightly underdone when you take them out of the oven. Another possibility is that your Greek yogurt had a lower fat content. Try using full-fat yogurt or adding an extra tablespoon of peanut butter next time.
Conclusion
There’s something truly magical about biting into a warm chocolate treat that satisfies not just your taste buds but your nutritional goals as well. These Dark Chocolate Peanut Butter Greek Yogurt Brownie Muffins have become my secret weapon for those moments when only chocolate will do, but I don’t want to abandon my commitment to nourishing my body.
I’d love to know if you try this recipe and what you think of it. Did your family guess they were “healthy,” or were they too busy reaching for seconds? Did you try any of the variations, or perhaps invent one of your own? The best recipes evolve as they’re shared and adapted in kitchens across the world.
Remember, eating well doesn’t mean deprivation—sometimes it just means being a bit clever about your ingredients. So preheat that oven, grab your mixing bowl, and prepare to change your relationship with chocolate treats forever. Your taste buds—and your body—will thank you.